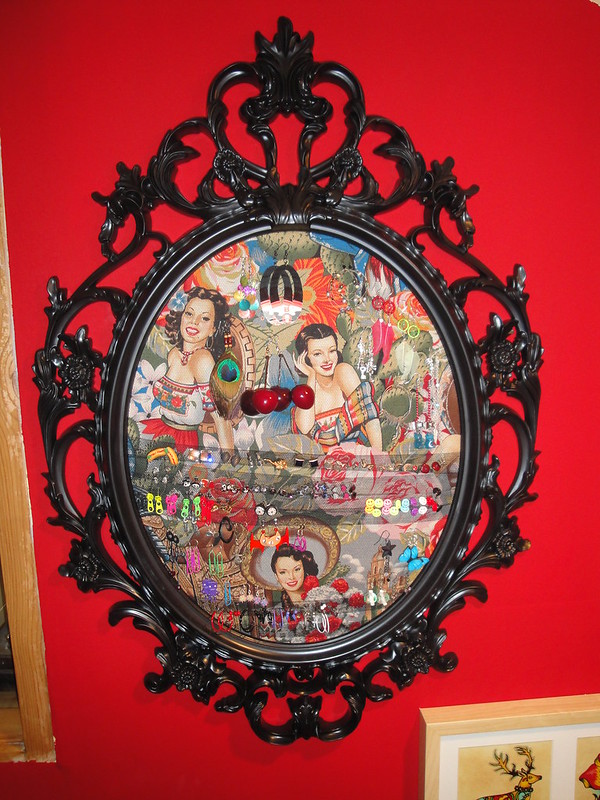
 |
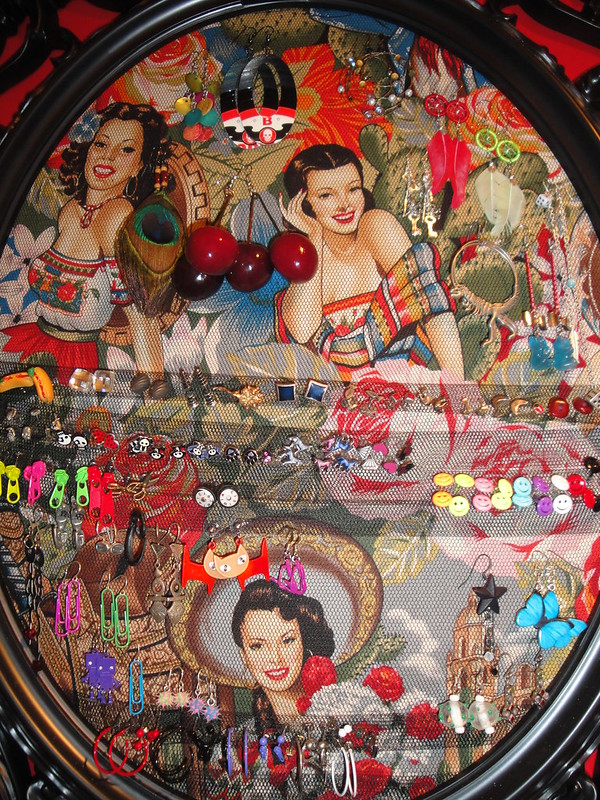
| The finished product. |
Needed:
- Picture Frame
- Background Fabric
- Net Fabric
- Cardboard
- Paper Stapler
- Iron, ironing board & water spritzer.
- Paperclips
Step One: Frame & Base
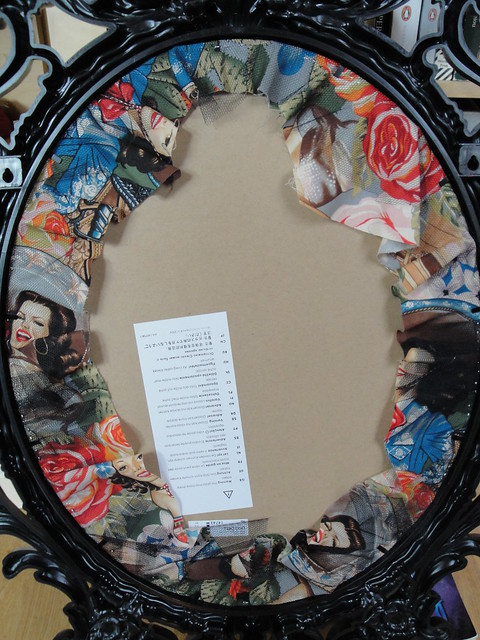 |
| View from the back. |
|
- To be truly eco-chic, find a cool frame at a junk store and paint/varnish the frame to suit your tastes. I, however, fell in love with IKEA’s UNG DRILL frame which put the cost of the project up a little. It was also useful however because the hooks for hanging are in the frame, not attached to chipboard backing.
- Measure the display area and add a couple inches around for whatever fabric you buy.
- My frame came with a cardboard back, which proved to be extremely useful. I haven’t tried this with the chipboard most frames are backed with, but I’m guessing it’s more difficult to adjust any runaway staples. I’d recommend finding some medium weight cardboard (from old packaging or something) and cutting it to the shape of the inside of your frame. This will be the backing, so make sure it fits correctly.
- Stretch your background fabric over the cardboard (not too tight), checking the placement and angle. Once you have it positioned as you want, staple the top, sides and quarters in between. It’s important to staple close to the edge and as unobtrusively as possible, so that it doesn’t show past the lip when in the frame. Don’t go nuts at this point with the staple, as you need to leave room for the netting.
Step Two: Netting & Stud Folds
 |
| The stud folds in action. |
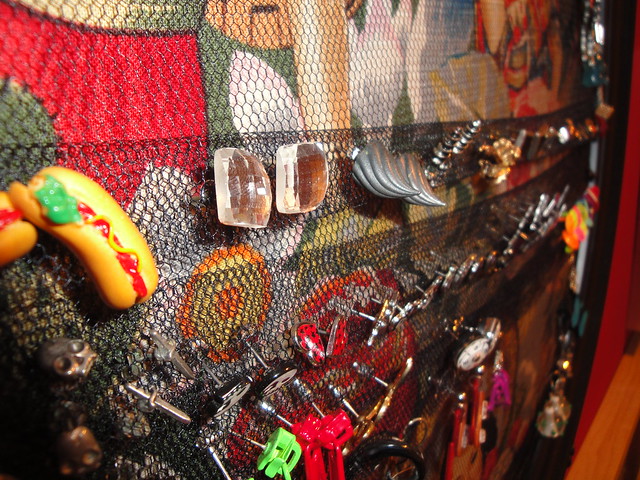
- Measure out the netting the same way as the base fabric, but leave extra for folding. I did six horizontal folds (for stud earrings – so you can fasten/unfasten the back), and I see no reason vertical folds won’t work as well. Generally I suggest just leaving a bunch extra fabric for this and cutting it down later, but you probably want another two or three inches per fold.
- Lay out the netting over your project, and work out where you want your stud folds. I chose the location of mine so they wouldn’t cover the lovely senoritas, but that’s really up to you, you could do all studs folds, or none at all.
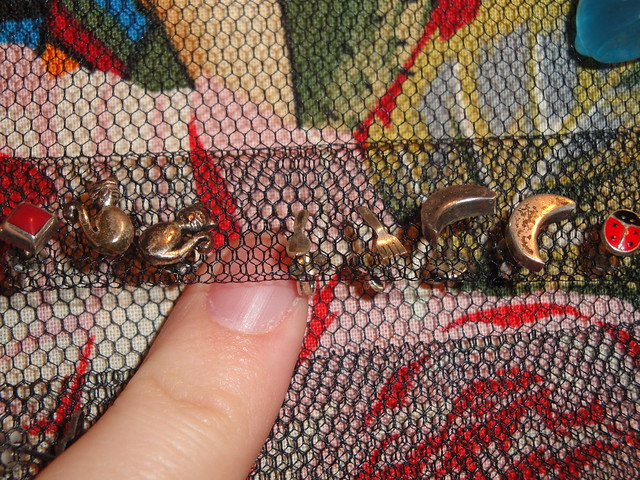
- I found paperclips were useful for holding the folded netting in place, since sewing pins slip right through. The clips did tend to get a little caught up however, so be careful when removing them.
 |
| Stud folds. |
- The netting fabric I used was nylon, so I used an iron on the lowest setting, and had plenty of water spritz on hand (not steam, I didn’t want to melt it). Keep the iron moving and go over the folds from both sides, careful not to iron the paperclips if you can help it. The netting never completely took the folds, though it did keep them sharp and looking good, so I suggest keeping the clips until you’ve completed the next step.
- Lay the netting over the base and use more paperclips to keep it in place as you check the positioning. The folds on mine went a little wonky, I blame the oval shape, it was really hard to judge how straight things were. Once you have yours placed as you want, staple the ends of the fold first, and check they’re held down. Then go crazy and fill in the gaps around the edges, making sure to keep the netting taut.
- Put it back in the frame as you would any other picture (only without the glass) and OMG you’re done – easy right?
 |
| Now go find all your forgotten earrings! |
Additional Notes/Variations:
- The two fabrics I used were fairly thin, so there was no problem fitting everything back in. However if you’re choosing heavier fabric, you might want to check before starting that you can still get the base in the frame. If not, CAREFULLY trim the edges of the cardboard until it fits.
- I’ve avoided sewing for three reasons: 1) I really don’t have mad skillz in that department. 2) I only have my mom’s old converted antique Singer, which pretty as it is (and boy, is it!) it only does straight stitches. 3) Staples seemed simpler to me. However, if you can think of a way to sew this bad boy, I say go for it.
- If you use second hand/recycled materials for this, it could be really, really cheap to make with brilliant results.
- In theory you could use a picture behind instead of fabric BUT I’m not 100% certain how you would attach the netting. One solution I did think of was this: Most frames go backing-picture-glass-frame, right? Well IKEA (yeah, again) sell a large square frame that’s designed a little deeper, with a special inner frame that means you can either have a picture right up against the glass or a couple inches behind it. I thought (mind you, I can’t guarantee) that instead of backing-picture-insert-glass-frame, you could do backing-picture-glass-insert-netting-frame. This would (again, in theory) mean that the picture and glass were all happy at the back, and the netting would be suspended a couple inches away, ready for your earrings.
- Pimping for necklaces & bracelets. This depends on your frame. You could attach hooks to the bottom and sides of a wooden frame, or what I’m planning on doing is tying thin ribbons to the outer frame and looping the jewellery through them. If you’re really handy, you could always attach a shallow box or dish to the bottom of the frame.
Source Materials: Things I Used
|


No comments:
Post a Comment